Posts

Formatting Text in Cells in MS Excel similar to MS Word!
Image
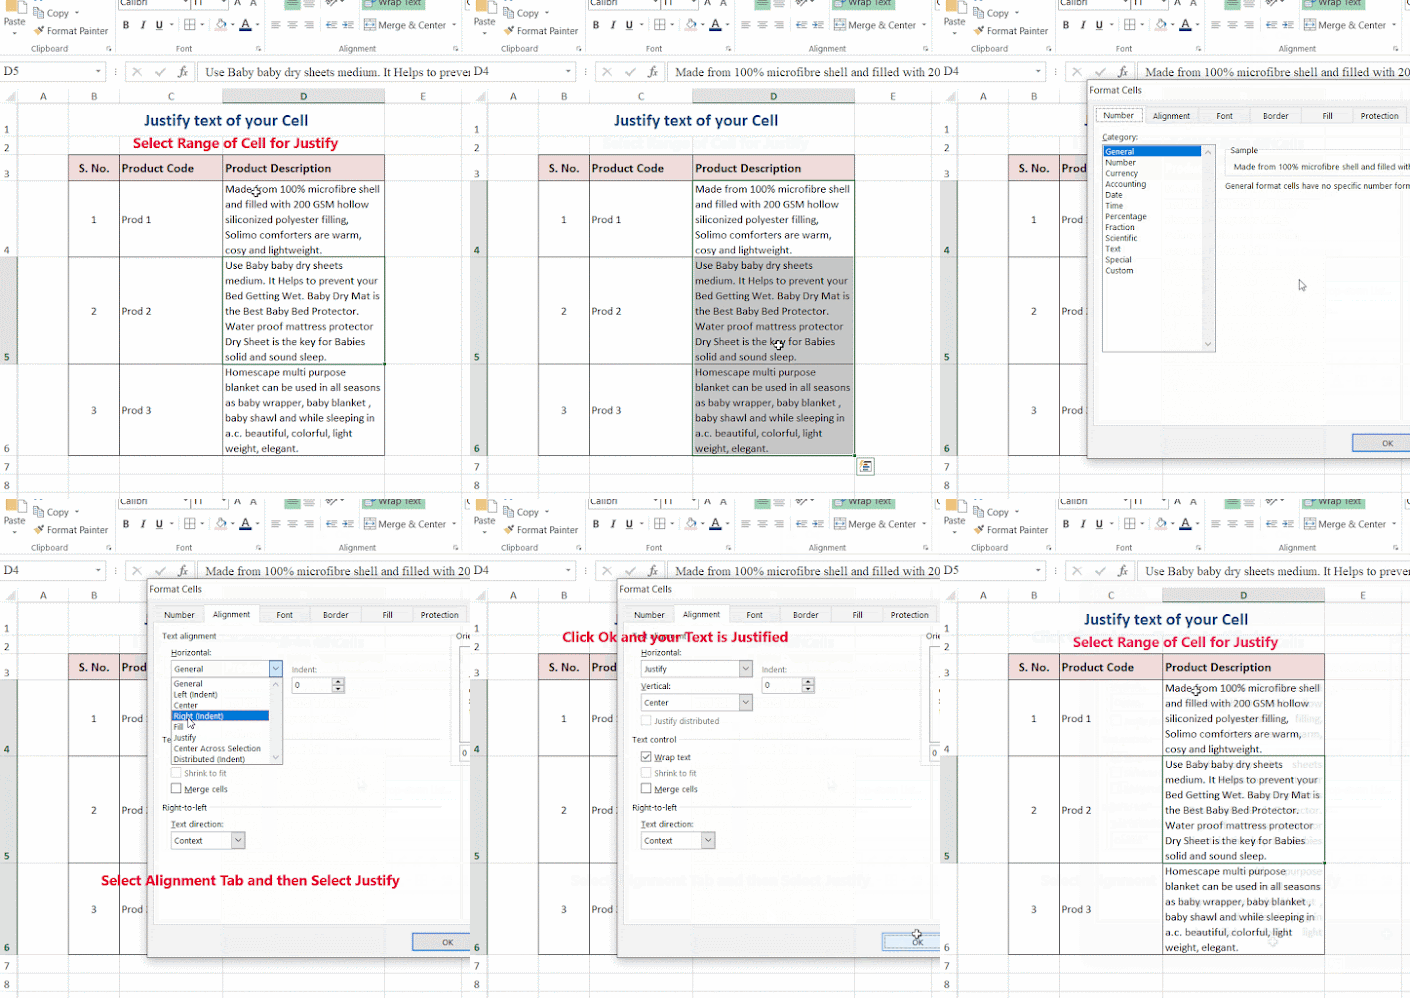
  Introduction       MS Excel is absolutely great for working with numbers but when it comes to formatting text in the Excel Cell, there is something which feels missing (or not directly accessible) in its text formatting capability especially if you are familiar with the MS Word. Although, the existing text formatting capabilities of MS Excel are enough in most circumstances but sometimes you do need something more for the sake of better presentation or readability.          In this article, I am going to share some cell formatting options available in Excel which you may find quite helpful. There are many folks who want to justify their text for symmetrical appearance. Some want their text to have MS Work like paragraph spacing. Some want to use Bullets or Indent text for enhanced readability. All these options are present in Excel to some extent placed under Cell Format Dialog Box and we will look at these options one by one. Justifying your text in a Cell       If you are having lo

Do the Data Entry in your Excel WorkSheet in a right way!

Image
Introduction Let's admit that entering data in your worksheet manually is not fun. Mostly, you get your data from other database in CSV and TXT format which you then import in your sheet or you do the copy from one location and then paste in your worksheet. But sometimes, it becomes necessary to feed data manually to your worksheet before you can unleash the power of Excel. It may be noted that data entry is a slow process and, if done in haste, it becomes prone to errors especially if you have delegated the data entry work to your subordinates (in many organizations there are data entry operators for this type of work).  The Data Entry work requires constantly looking at the source material and then typing it in the designated Cell of your worksheet. In most cases, you type the contents of one cell and then press Enter or Tab to move Down or Right of your cell. In most cases, you want to move down in your Excel Worksheet in row by row manner (especially if your source material is

Take the print out of your spread sheet the way you want.

Image
  Introduction It is a common workplace issue that people face when they take the print out of their neatly created Excel sheet only to find out that one or more columns of their Excel sheet have exceeded the margin of the A4 sheet. It is frustrating and also leads to the wastage of paper.   Excel automatically divides your sheet into separate pages for printing based on margin settings, scaling option, paper size etc. without any regard to the number of columns or rows you may be having. As the number of columns of your sheet increases, it becomes more likely that your sheet will not print the way you want i.e. all columns in one page or all rows in one page. People try many ways to work around this by changing the Font Size, manual resizing of Cell width, applying Landscape orientation to accommodate more columns in one page etc. But sometimes, even after these adjustments the sheet just doesn’t fit in one page. Also, it doesn’t increase your productivity if you are doing such